
Mortality composting is usually conducted in windrows/piles out in the open, or in purpose-built bays under a roof (Figure 6). We will focus this discussion on setting up these types of systems because all other approaches (e.g. in-vessel containers and rotating drums) are essentially variations on the same theme. Though mortality composting is used to dispose of poultry carcasses, the same general approach could be used for disposing of other hazardous waste streams, such as broken eggs and chicks.
Mortality composting is essentially a two-stage process:
In Stage 1, the carcass compost mix is fully encased in clean, high-carbon co-composting material (e.g. sawdust or shavings). This material acts as a biofilter, preventing odours and bioaerosols from escaping from the compost. The use of the casing also maximises the likelihood that all bio-hazardous compost materials are exposed to thermophilic composting conditions (>45°C) before the compost is moved or turned. When set up, these piles should be left undisturbed until most of the carcass tissue has decomposed (usually about 10–14 days). Disturbing the pile too early is a health and biosecurity risk.
Stage 2 begins when the pile is turned (e.g. into the adjacent bay) and ends when the compost is ready for curing (about 4 weeks)[1]. The clean casing material is mixed in with the rest of the compost during the first turn. In this stage, piles are essentially handled like conventional compost. A small amount of tissue might be evident early in this stage, but it would have already been exposed to extended periods (e.g. min 7 days, probably more) of high-temperature composting (45–65°C). The sight of remnant tissue may be unpleasant, but it should be safe enough to handle in a prudent manner.[2]
When setting up a windrow or pile, a base layer of clean, high-carbon co-composting material is first placed on the ground. If the pile is under a roof, then a 300-mm deep layer of a material such as sawdust should suffice. If the pile is in the open, then this layer should be about 450mm deep.
The carcass-compost mix can then be transferred from the mix preparation area onto the base layer. Ideally, the carcass-compost mix already comprises a 2:3 ratio (by volume) of carcass and co-compost. The pile can be built up to a height of about 1.5 m, after which the top and sides are covered with clean, high-carbon co-composting material (the ‘capping’). The capping layer should be 300mm deep for piles built under cover, and 450mm for those in the open. The total height of the pile should not exceed 1.8m. The width at the base will typically be 3–4m for windrows. For those in bays, the width of the pile is governed by the size of the loader bucket.
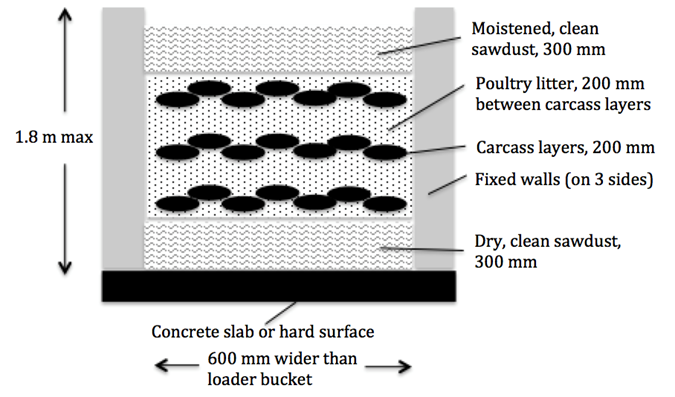
Sometimes it is more convenient to layer mortalities in a compost bay as they are collected (Figure 17). Note how clean co-compost material is recommended for the base and capping layers while the co-compost between layers of carcasses can include poultry litter (if available).
The recommended layering process in a covered compost bay is as follows:
- Place the base layer of clean co-compost material down, as described above.
- Place a layer of carcasses on top of that (at about 200mm thick).
- Cap the pile with 300mm of clean co-compost material.
- Lightly moisten the capping layer.
- When a new layer of carcasses is to be added, scrape away 100mm of the capping and place the dead birds on top. Now there should be a 200-mm co-compost layer between the two carcass layers.
- Place the excess capping that was scraped away on top of the new layer, topping up with more clean co-compost material to a depth of 300mm.
At least three bins are usually in operation at any one time—one being filled, another in Stage 1 composting, and the other in Stage 2. A pile is sometimes substituted for the second bin in two-bin systems. As a general guide, 10m3 of bin space is needed for every 1000kg of carcass (Mukhtar et al., 2004).
When compost bays are used, fresh compost mixes are established at one end of the facility with more advanced stages of composting occurring at the other end. When windrows are used, one end of the windrow may contain fresh compost, while at the other end the compost is ready to be moved to the curing area.
In summary, critical control points for mortality composting include the following:
– Use only clean co-compost material for encasement.
– Use deeper layers of co-compost material for encasement when piles are out in the open.
– Turn or move the compost only after Stage 1 composting ends (when the carcasses have had time to decompose – check before proceeding).
– Stage 1 composting is not deemed to have begun until the last carcass layer has been added to a pile (when carcasses are added in layers, a pile may take a week or two to complete).
– Turn or move the compost in sequence – oldest first, freshest last. This reduces the risk of cross-contamination between piles of different ages.
[1] It is not classified as finished or mature compost at this stage. But the compost can be safely matured in storage over a period of months.
[2] Usual hygienic practices still apply, e.g. using personal protective gear, washing hands and equipment, and minimising dust dispersal during turning etc.