
Effective control of composting and troubleshooting with confidence require the following:
- Some knowledge of the biology and the mechanics of composting.
- Applying this knowledge in practice. Through practice one can predict the outcome when different management actions are taken and can also anticipate potential problems.
- Having effective process monitoring protocols and using them.
Fortunately, monitoring of composting is a relatively simple process. Pile temperature is the best indicator of progress. Temperature must be monitored and recorded for three reasons:
- To provide information on the progress of composting
- To support operational decisions about how to manage the composting process (e.g. when to turn and water)
- To ensure that temperatures are high enough to eliminate pathogens and/or weed seeds.
The vast majority of pathogens are highly susceptible to composting (see Wilkinson (2007) for specific details to poultry mortality composting). The general pathogen-reduction guidelines stipulate that the entire compost mass has been subjected to temperatures above 55°C for a minimum of 3 consecutive days (USEPA, 2003). This guideline should generally be achieved within about 21 days, provided the compost has been turned a minimum of 5 times.
In a new operation, a thorough temperature profiling is needed to establish the ‘typical’ temperature pattern for the entire composting process of a given feedstock. A typical pattern should emerge after only 2 or 3 batches have been composted. When this is established, an operator can follow a simplified monitoring procedure to ensure that a given batch proceeds according to the typical pattern.
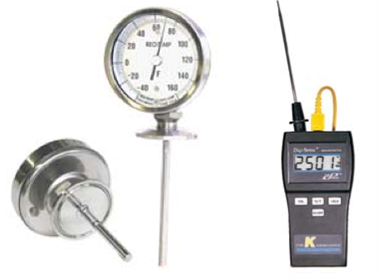
A hand-held temperature probe with a 1-m long stainless-steel shaft can be used, or a temperature reader with a thermocouple probe (Figure 18).
For routine temperature monitoring, follow these general procedures:
– Insert the temperature probe horizontally into a compost pile at half-height in at least 3 different places. Windrows longer than 10m may need more readings, e.g. every 4 or 5m of windrow length.
– Ideally, at each location, take temperature readings at three depths in the horizontal plane (e.g. 40, 70 and 100cm).
– Monitor temperatures every 2 days at the start of composting to ensure the heap reaches thermophilic conditions quickly. When thermophilic conditions are reached, twice weekly monitoring is usually enough because temperature changes slowly.
– In on-farm operations, composting for extended periods (e.g. 9–12 months), temperature monitoring can be much less frequent (e.g. every few weeks until the process is complete).
When windrows dry out and start overheating, temperature measurements alone can be misleading. Therefore, monitor moisture levels alongside the prevailing temperature regime.
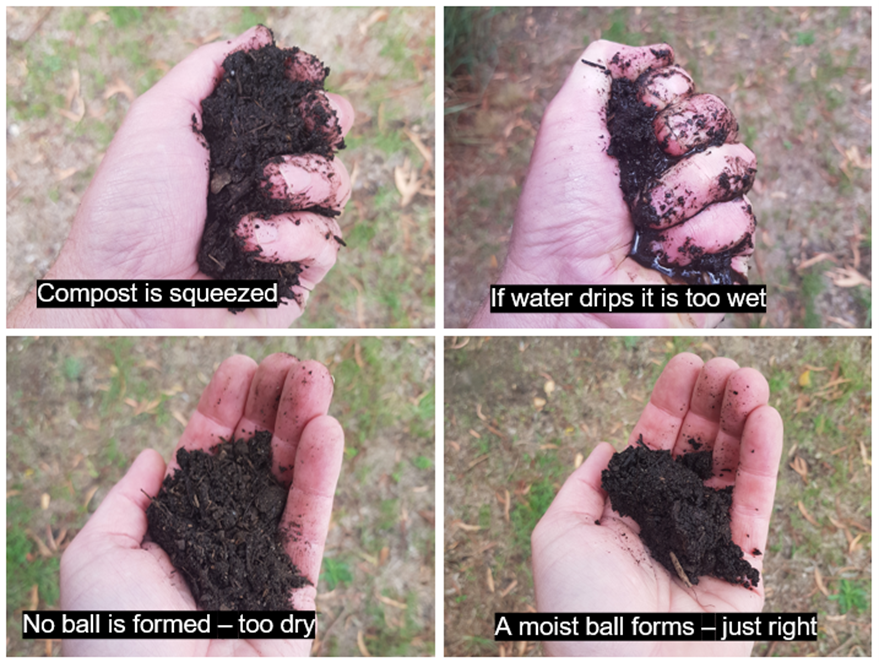
With a little practice, moisture content can be estimated quite accurately with the feel of the compost in the hand. This method is used routinely to estimate moisture content in the raw mix, as well as for monitoring moisture content during composting[1].
A good analogy for compost at 50% moisture content is that of a wrung-out moist sponge – it is obviously moist, but water should not run from it if it is squeezed in the hand.
Follow this procedure for monitoring compost moisture content (Figure 19):
- Take a handful of compost and close your hand around it to make a fist.
- Tightly hold your fist closed. Observe whether any water runs between the fingers or falls to the ground. If this happens, the compost is too moist.
- Open your hand. If the compost has not formed into a ball on the hand, it is too dry. If it forms a ball on the hand and breaks up under light pressure, it will be at the correct moisture content.
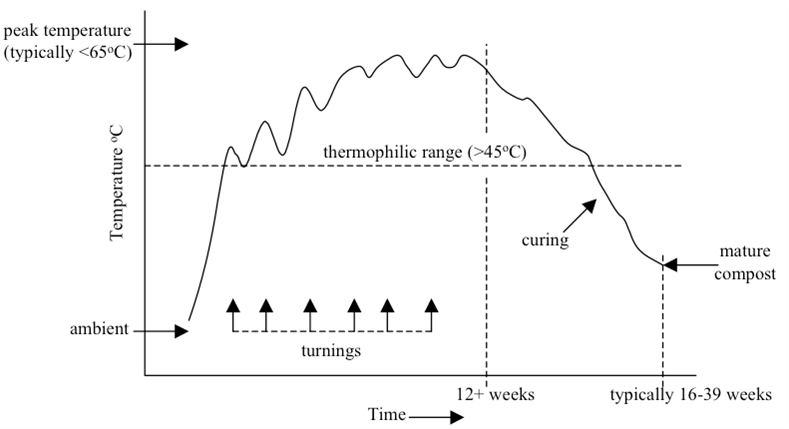
As discussed, compost operators should become quickly familiar with how their process performs. The general pattern of performance typically looks something like this (Figure 20):
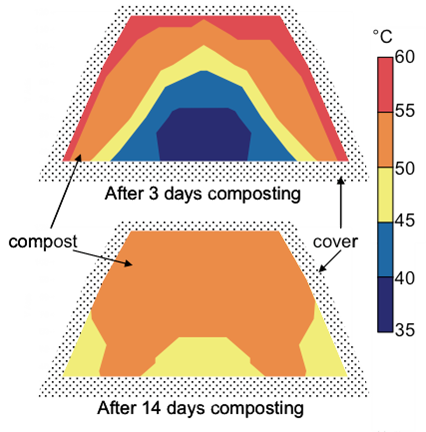
- When compost starts out at near ambient temperature, it reaches thermophilic conditions (>45°C) usually within 12–24 hours. The pile heats from the inside out.
- In the core of the pile, the hot zone gradually expands over a few days, reaching peak temperatures often above 65°C. At this point, the core temperature may start to fall as the supply of oxygen to the microbes becomes limiting. The pile is typically turned at this point.
- After turning, there is often a short period (a few hours) of lower temperatures before high temperatures are quickly re-established due to oxygen being replenished.
- Temperatures around 45–65°C can be maintained for three months or more (depending on feedstock).
At this point, peak temperatures slowly begin to decline, and the maturation phase of composting begins. Technically, composting might not be complete for another 12 weeks or more. But the compost can usually be safely stored (with little further management) when peak temperatures are within 10°C of ambient.
The performance pattern for mortalities can be a little different (Figures 21 and 22):
- In contrast to conventional composting, mortality compost piles heat up first in the outside layers. The edge of a fully constructed pile should reach >45°C within the first 2–3 days of composting. The core might take a few days to a week longer. Temperatures tend to converge after about 7–10 days.
- Peak temperatures well above 55°C should be expected after about 7–10 days composting.
- The compost just above the base layer will almost always be cooler than the upper layers of the pile. The coolest part is therefore typically at the base in the core of the pile, which could take 10 days to reach >45°C.
- In the upper layers, temperatures may fall gradually after about 7–10 days composting, even before the base layer temperatures begin to plateau.
- After the pile has been turned for the first time, the pattern of temperature development should begin to look more like a conventional compost pile.
These performance indicators were developed after extensive Australian research (Wilkinson et al., 2014).
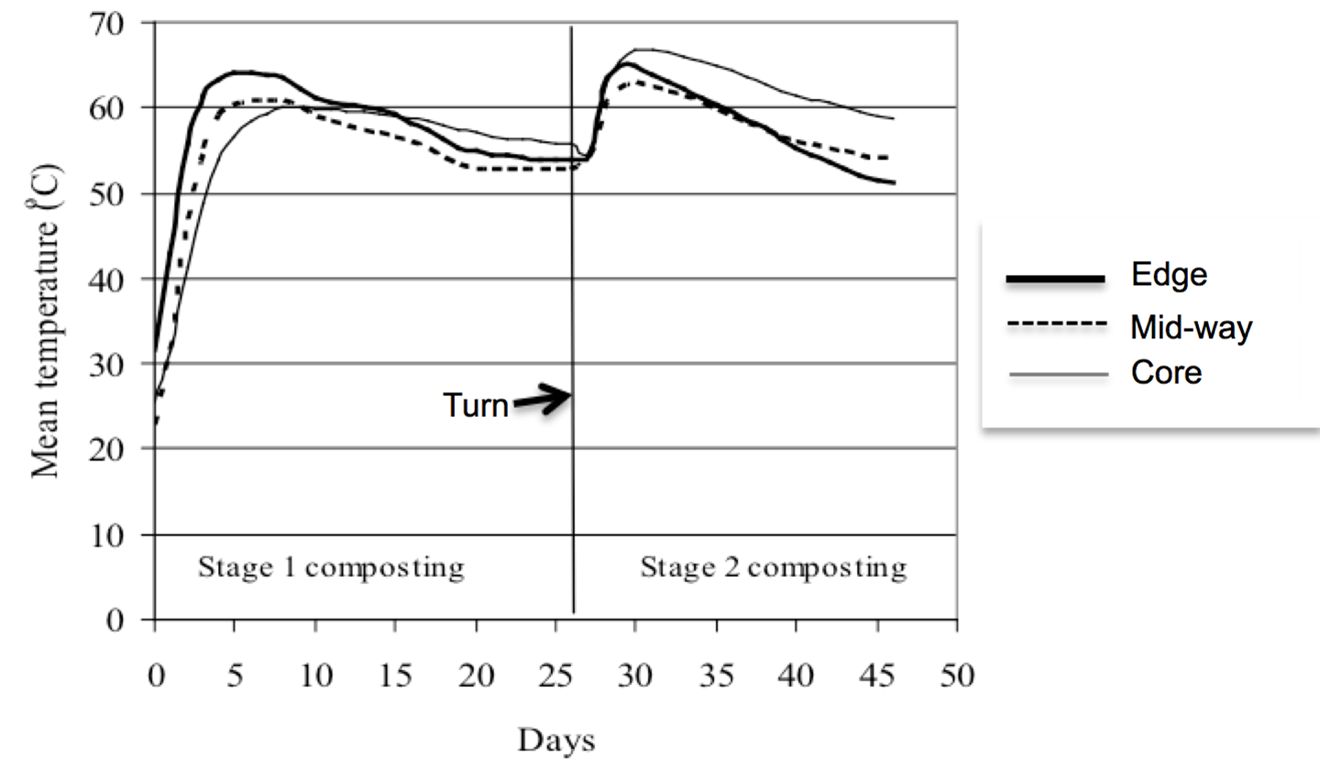
Keep in mind that these performance patterns are most relevant for mortality composting piles set up to completion in one hit. Piles that are constructed in layers over time may behave a little differently.
When a simple monitoring process has been established for temperature and moisture content, many common problems can be diagnosed and rectified by examining pile conditions (Table 4).
Table 4. Guide for diagnosing and treating temperature-related problems during composting (adapted from Rynk et al. (1992).
| Problem | Possible reason | Other clues | Remedy |
|---|---|---|---|
| Pile fails to heat up | Materials too dry | Can't squeeze water from materials | Water or add wet ingredients |
| Materials too wet | Pile looks soggy and slumps | Add dry ingredients and remix; form windrows to shed rainfall | |
| Not enough N, or slowly degrading or stable materials | Very high C:N ratio; wood feedstock | Add high N ingredients | |
| Poor structure | Pile compacted; few large particles; not too wet | Adjust size-reduction equipment for larger particle size; add bulking agent | |
| Small pile size | Height <1m | Enlarge piles or add highly degradable ingredients | |
| Temperature falls too soon | Low oxygen; need for aeration | Temperature declines gradually, not sharply | Turn pile |
| Low moisture | Can't squeeze water from materials | Add water | |
| Uneven temperature in pile | Materials poorly mixed | Visible differences in materials alone pile | Turn or remix pile |
| Temperature falls gradually; doesn't reheat after turning | Composting nearing completion | Approaching expected composting time period; adequate moisture available | None required |
| Low moisture | Can't squeeze water from materials | Add water | |
| Pile overheating (>65°C) | Insufficient aeration | Pile is moist | Turn pile |
| Moderate to low moisture | Pile damp but not wet or dry | Add water and turn | |
| Pile too large | Height >2.5m | Shorten pile | |
| Very high temperatures (>75°C) | Pyrolysis or spontaneous combustion | Materials dry; interior looks or smells charred, smell of ammonia | Decrease pile size; maintain proper moisture content; break down pile and add water to charred or smouldering sections |
[1] It will not be possible to use this method in the early stages of mortality composting – only when composting is well advanced.