
This is the second step in the cleaning process, and the most critical step to achieving successful decontamination, as properly cleaned surfaces are much easier to sanitise. The detergent selection must be based on the capacity of the detergent to solubilise soils and organic matter, and must be safe on the surfaces being cleaned. The detergent must also thoroughly wet out (penetrate) the soils and hold them in solution, enabling them to be readily rinsed off. When selecting the cleaning agent, it is essential to consider the compatibility of the cleaning agent with the selected sanitiser. Advice should be obtained from the chemical supplier regarding compatibility. The detergent must not neutralise the effect of the sanitiser if there is a residue of detergent remaining on surfaces being cleaned. For example, if the detergent is highly alkaline, it could interfere with the action of an acidic sanitiser.
Most detergents contain surfactants. These surfactants act as an activating agent by lowering the surface tension between the solution and the organic matter, allowing the detergent to solubilise proteins and other organic matter that may be present on various surfaces in the shed’s internal structure – meaning they can be easily rinsed off.
Foam detergent is a particularly effective and highly recommended chemical for cleaning. This is because the foam bubbles continue collapsing onto the surface, enabling a prolonged release of the active chemical. The active chemical has a longer contact time with the surface to penetrate and solubilise organic matter. Other application methods should be under the direction/advice of the chemical supplier.
However, when the environmental temperature is high during summer (such as above 35 °C with less than 20% humidity), the cleaning chemical may dry on surfaces before rinsing. In such cases, the contact time must be adjusted to ensure the rinsing step is carried out before the chemical dries. The operator must be aware of these risks and carefully observe the drying time.
The air, water and chemical ratio are critical to achieving the right foam consistency so it lasts on surfaces for at least 15 minutes. The ratios are specified by the chemical supplier. Foam detergent will also effectively cover rounded surfaces (such as around pipework). Figure 5 shows the consistency of foam detergent while Figure 6 shows the consistency of foam detergent when applied to a wall.
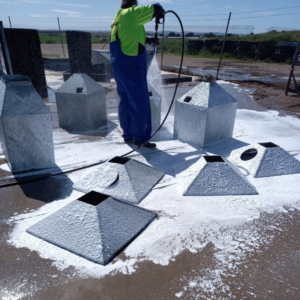
Figure 5. Consistency of foam detergent.
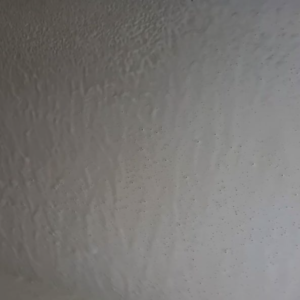
Figure 6. Consistency of foam detergent when applied on a wall.
Structures that can be dismantled and reassembled must be removed, cleaned and rinsed outside the shed. When structures are washed outside offsite, the washing area must be covered with concrete and have a good drainage system to collect runoff from the washing. Cleaned equipment must be returned to the shed for sanitisation.
Non-foaming detergents are only useful where the equipment being washed can be soaked in the detergent solution to allow good penetration of soils, or where scrubbing can be applied to surfaces, such as by hand or in a washing machine, to remove organic matter.
It is recommended the first application of water on surfaces must have a cleaning agent capable of killing microbes. Otherwise, runoff will carry the microbes into the environment, especially outdoors and inside the shed if it has dirt floors. This can be achieved with the use of an acid cleaner.
The sequence of cleaning is critical for effective decontamination. The cleaning step should start outside the shed and progress to inside the shed. This ensures any organic matter that gets inside the shed from this process will be re-cleaned.
The cleaning sequence within the shed must be designed to minimise recontamination of surfaces. The following description indicates the basic principle of starting from the middle of the shed and working towards the ends, and from the highest points of the shed to ground level, with adjustable equipment positioned at working height. If this is not possible, structures in the shed must be cleaned with the aim that splashback, particularly from high-pressure rinsing, is not recontaminating higher structures.
Foam must always be applied from a lower point to a higher point so that fresh foam is being applied directly to the surface being cleaned. Rinsing is carried out in the opposite direction so that the highest surfaces are cleaned first (and then not recontaminated by the rinsate).
The inside of the shed should be foamed and rinsed by section. The following instructions mention the rinsing step when it needs to be applied before moving onto the next structure to be foamed and rinsed. Detailed information regarding the rinsing step is in the following section of this report.
Firstly, the outside of the shed must be cleaned. Walls, doors, pop holes, vents, blinds and any other structures on the outside of the shed need to be foamed from the ground up so that fresh chemical is always being applied to a dry surface. All surfaces must then be rinsed from the highest point downwards (see the rinsing step information for recommended equipment and technique). Care must be taken to ensure rinsing occurs before the solution dries on walls; this may be hastened by direct sunlight. The reason the outside of the shed is done first is to ensure any leakage into the shed will then be cleaned.
Once the cleaning crew is inside the shed, cleaning should start from the wall/ceiling junction. The recommended sequence for cleaning is as follows (see Appendix 7 for diagrams):
- Cleaning inside the shed should commence with the ceiling (refer to Appendix 7 for an image of the process flow). The cleaning crew must start by applying foam from the side of the ceiling (next to the wall), working their way to the middle (apex of the ceiling).
- All structures on the ceiling, such as cables, chimneys and electric fixtures, should be appropriately soaked with foam detergent.
- The crew should start foaming from the centre of the shed and work towards the ends of the shed. This allows for complete coverage of the shed and will prevent areas being missed.
- Rinse the ceiling after the recommended contact time is achieved for the cleaning chemical (taking climatic conditions into account – ensure surfaces are still wet).
- The next structures to be washed are the drinkers (Figure 7), feeders, perch rails and nest boxes. Drinker and feeder lines being at the correct height plays a vital role during foaming and cleaning.
- The drinker lines should be positioned at chest height of the cleaning crew. This height is ideal for targeting the inside and bottom of the drinker lines with detergent.
- If there are circulating fans present in the shed, foam these fans after the drinker lines.
- Rinse the drinkers and circulating fans. The rinsing instructions for drinkers and fans are provided below. Once rinsed, raise the drinkers.
- The next step is to clean the inside of the feeders. It is recommended feeders be lowered to knee height to target the inside of the feeders with detergent.
- If perch rails are present, foam the perch rail along with the feeders.
- Rinse the inside of the feeders and perch rails. Rinsing instructions are provided below.
- The feeders now need to be lifted to target the bottom of the feeders. The feeders should be raised to chest height of the cleaning crew (Figure 8).
- Rinse the bottom of the feeders after the appropriate contact time according to chemical manufacturer’s instructions has past (typically about 15 minutes – but before drying occurs).
- Raise the feeders after the bottom has been foamed and rinsed.
- Next, foam the nest boxes, nest pads, egg belts and extraction fans.
- Where the height of the feeders, drinkers and other internal structures cannot be altered, the application of the foam cleaner must be carried out with the structures in place.
- Next, foam the walls from bottom to top. The area between the dwarf wall and pop holes in free-range farms must not be neglected.
Rinsing instructions for the wall and mini vents are provided in the next section.
Figure 7. Foaming drinkers.

Figure 8. Foaming feeders.